Introduction
In our previous blog, we explored how memory constraints in deep learning arise from fundamental design choices like vocabulary size, sequence length, and attention mechanisms. We discussed how recent models from DeepSeek to SigLIP, are tackling these bottlenecks with clever architectural shifts such as grouped-query attention and reduced image tokenisation. These changes, while driven by speed and efficiency, ultimately come down to a single question: How can we do more with less GPU memory?
In this follow-up post, we take the next step on that journey.
Now that we understand how to reduce memory usage at the architectural level, what about scaling up compute itself? Whether you’re training a small model on a single 8GB GPU or orchestrating a trillion-parameter model across clusters, the key lies in knowing how to distribute computation and manage memory across both GPU cores and GPU devices.
We begin by revisiting gradient accumulation, a key technique for training large batches on small hardware. Then, we broaden our lens to explore the full spectrum of parallelism in modern model training, from optimisations within a single GPU to 5D parallelism strategies across nodes.
Along the way, we’ll introduce a unified diagram that ties together each concept, and by the end, you’ll be able to decode how hyper-scale models like GPT-7 are actually trained.
To give you a quick visual overview, here’s what the 5D parallelism pipeline looks like:
Each box represents a key transformation or computation block that occurs in a modern transformer model, and each parallelism strategy helps optimise memory or compute at that stage. We’ll walk through each one step by step.
Here’s what we’ll cover:
- Gradient Accumulation - Accumulate gradients across micro-batches to emulate larger batch sizes with limited memory.
- Levels of Parallelism - Understand the two axes of optimisation:
- Intra-GPU parallelism (within a GPU)
- Inter-node parallelism (across GPU devices)
- The 5D Parallelism Framework
- Data Parallelism - Split data across replicas
- Tensor Parallelism - Split matrix operations across cores/devices
- Pipeline Parallelism - Split model layers across devices
- Sequence and Context Parallelism - Handle long sequences efficiently
- Expert Parallelism - Route tokens across sparse experts in MoE models
- Putting it All Together - A visual map of distributed training in action
By the end of this guide, you’ll not only understand how large models scale compute and memory, but also how to replicate those strategies even in resource-constrained environments.
1. Gradient Accumulation
When training large models on memory-limited hardware (e.g. an 8GB GPU), fitting large batch sizes into memory can sometimes be impossible. Gradient accumulation solves this by allowing us to simulate large batch training through multiple smaller forward/backward passes, without increasing memory consumption.
Instead of processing the entire batch at once, we split it into micro-batches and:
- Perform forward and backward passes successively on each micro-batch.
- Compute the gradients for each micro-batch, but do not update weights yet.
- Accumulate gradients across micro-batches.
- Once all micro-batches have been processed, take the average of the accumulated gradients and perform an optimiser step (update the weights).
This allows us to train with an effective global batch size without needing memory for the entire batch at once.
Mathematical Formulation
Let’s define the variables as used in Hugging Face’s Ultra-Scale Playbook:
- : Micro-batch size - the batch size per forward pass.
- : Number of micro-batches before weight update.
- (or ): Global batch size - total batch size per optimiser step.
The relation is:
Example: If and , then , even if your GPU can only hold a batch of size 4 in memory.
Each micro-batch independently performs a forward and backward pass. The resulting gradients are accumulated over time, and only after all micro-batches are processed is a single optimiser step taken.
Memory Efficiency
Gradient accumulation is particularly helpful because activation memory grows linearly with batch size. By using smaller micro-batches, we keep peak memory constant while simulating a much larger batch size.
- Compatible with activation recomputation for even more savings.
- Buffers are needed to store intermediate gradients during accumulation.
- Without accumulation, backward passes can immediately free memory, slightly reducing memory pressure.
Trade-Offs
| ✅ Pros | ❌ Cons |
|---|---|
| Enables training large effective batch sizes on memory-limited GPUs | Slightly increases total training time (multiple forward/backward passes) |
| Reduces activation memory requirements | Adds complexity for syncing gradients across devices (if using DP) |
| Compatible with mixed-precision training and recomputation |
Parallelising Micro-Batches
Importantly, micro-batch forward/backward passes are independent of each other, they process different data samples. This opens up the possibility of running micro-batches in parallel across multiple GPUs, which leads naturally into our next topics of Data and Model parallelism.
2. Levels of Parallelism
Before diving into individual techniques like Data or Tensor Parallelism, it helps to zoom out and ask: where exactly can we parallelise computation in deep learning?
In modern training setups, there are two main axes where we can distribute and optimise workloads:
- Within a GPU - Making the most of each core, register, and memory bank.
- Across GPUs - Spreading model components or data across multiple devices and even across nodes.
This section builds a conceptual bridge between memory-saving tricks (like gradient accumulation) and full-on distributed training. We’ll introduce three progressive levels of parallelism: Why Parallelism, Intra-GPU Optimisation, and Multi-GPU Scaling.
2.1 Why Parallelism?
Training large models is fundamentally bottlenecked by two hard constraints:
- Memory capacity (What fits in GPU memory?)
- Compute throughput (How fast can we execute operations?)
On a single GPU, these limits are hit quickly as model sizes and
sequence lengths grow.
Parallelism helps us overcome this by:
- Splitting memory and compute across devices
- Exploiting concurrency to speed up training
However, distributing work introduces a new challenge: communication. Every new dimension of parallelism adds some overhead, so choosing where and how to parallelise becomes critical.
2.2 Intra-GPU Optimisation (Core-Level)
Even before scaling across GPUs, we can optimise how a model runs on a single GPU. This involves leveraging the hardware more effectively through:
Mixed Precision Training (e.g., BF16, FP16):
Use low-precision formats where possible to reduce memory usage and increase throughput, while retaining FP32 master weights for stability.Tensor Cores & Fused Kernels:
Modern GPUs (like NVIDIA’s Ampere/Hopper) have Tensor Cores that excel at mixed-precision matrix math. Fusing multiple operations into a single kernel reduces memory reads/writes and boosts efficiency.CUDA Streams and Asynchronous Execution:
Overlapping data transfers and compute using multiple CUDA streams helps reduce idle time.
Together, these techniques let you maximise the performance of a single device. But eventually, even the best-optimised GPU hits its limits.
2.3 GPU Parallelism (Across Devices)
Once a model no longer fits in a single GPU or training becomes too slow, we turn to multi-GPU and multi-node strategies.
This gives us access to:
- More memory (to fit larger models or longer sequences),
- More compute (to reduce training time).
This is where 5D Parallelism comes in. It’s the set of techniques used in modern large-scale training systems (e.g. LLaMA, GPT-4, DeepSeek) to scale efficiently across many GPUs and even multiple nodes.
The five “dimensions” of GPU parallelism are:
- Data Parallelism - replicate the model and split data across devices.
- Tensor Parallelism - shard matrix operations within layers.
- Pipeline Parallelism - shard the model across layers/devices.
- Sequence/Context Parallelism - handle long input sequences efficiently.
- Expert Parallelism - activate only parts of the model using MoE routing.
Each dimension addresses a different bottleneck: memory, compute, or communication, and in practice, they’re often combined for maximum efficiency.
The following diagram shows how these techniques fit together, moving from intra-GPU tricks to cross-node strategies. The diagram flows from the most local (inside a GPU) to the most distributed (across clusters).
Techniques are grouped by scope:
- Within-GPU (Core-Level): Inter-core tricks like mixed precision, fused ops
- Across GPUs (Node-Level): Shard matrices (TP), sequences (SP), attention (CP)
- Across Nodes: Whole model replication (DP), layer division (PP), dynamic routing (EP)
Up next, we’ll start with the most intuitive of these: Data Parallelism, and how it evolves into ZeRO strategies for even greater efficiency.
3. Data Parallelism
Data Parallelism (DP) is often the first step toward multi-GPU training. It’s intuitive: if you can’t fit more data on one GPU, split the data across many.
How it Works
Each GPU holds a full copy of the model, but processes a different subset of the data. After the forward and backward passes, the gradients from each device are synchronised (via All-Reduce) and then averaged before updating the model weights.
This ensures:
- All model replicas remain synchronised.
- The training behaves as if it were done on a large batch.
Key Communication Primitives
| Operation | Purpose in DP |
|---|---|
| All-Reduce | Aggregate gradients across devices so each GPU has the same updated gradients. |
| All-Gather | Distribute gradients or activations across devices (used in more advanced setups). |
| Reduce-Scatter | Combines reduction and sharding - useful in ZeRO implementations. |
Smarter Data Parallelism: Optimisations
Vanilla DP works, but it’s inefficient at scale. Let’s look at three optimisations that supercharge DP for real-world usage.
1. Overlap Gradient Sync with Backward Pass
Naively, you wait for all gradients to finish computing before syncing them. But why wait?
Instead, use hooks to start syncing a parameter’s gradient as soon as it’s ready, overlapping communication with computation.
for p in model.parameters():
    if p.requires_grad:
        p.register_post_accumulate_grad_hook(all_reduce_hook)
This greatly reduces idle time and improves GPU utilisation.
2. Gradient Bucketing
GPUs prefer fewer large operations over many small ones. So instead of syncing each gradient individually, group them into buckets and perform fewer, larger All-Reduce operations.
Think of it like shipping goods: better to send a few full trucks than hundreds of tiny boxes.
3. Interplay with Gradient Accumulation
When combining DP with gradient accumulation, you shouldn’t sync gradients after every micro-batch.
Instead, accumulate gradients locally and sync only after the final micro-batch in each step. In PyTorch:
with model.no_sync():
    loss.backward()
This avoids redundant communication and improves training efficiency.
Revisiting Global Batch Size
When using both DP and gradient accumulation, the total global batch size is:
Where:
- = micro-batch size per forward pass
- = number of accumulation steps
- = number of data-parallel GPUs
You can trade off between these values to reach a target GBS depending on available compute and memory.
Example: Scaling with DP and Accumulation
Let’s say you want to train a model with a GBS of 4M tokens, using a sequence length of 4k. That means:
- Each GPU can handle 2 samples at a time.
- You have 128 GPUs.
So you’ll need:
Now say you upgrade to 512 GPUs. You only need:
Training becomes faster - same GBS, fewer accumulation steps.
Beyond DP: Enter ZeRO
All of this assumes the model fits on a single GPU. But what happens when the model becomes too large to replicate?
This is where ZeRO (Zero Redundancy Optimizer) comes in.
ZeRO introduces a smart idea: instead of duplicating everything on each GPU, let’s shard:
| ZeRO Stage | What’s Sharded | Communication Pattern |
|---|---|---|
| ZeRO-1 | Optimiser states | All-Gather (params after update) |
| ZeRO-2 | Optimiser states + gradients | Reduce-Scatter (grads) + All-Gather (params) |
| ZeRO-3 | Everything (params too!) | On-demand All-Gather + Reduce-Scatter |
Each stage progressively reduces memory usage and increases scalability.
We’ll break these down clearly in the next section before moving on to Tensor Parallelism, which tackles the next challenge: when even sharding model state isn’t enough.
4. ZeRO: The Zero Redundancy Optimizer
While Data Parallelism helps us scale training across devices, it hits a memory wall when we try to train truly massive models. Why?
Because each GPU still stores a full copy of:
- The model parameters
- The gradients
- The optimiser states (e.g., moment estimates in Adam)
Enter ZeRO, a powerful optimisation that removes this redundancy by sharding different training components across GPUs.
4.1 The Three Stages of ZeRO
ZeRO works in stages, each adding another layer of memory savings:
| Stage | What’s Sharded | Communication Required | Memory Reduction |
|---|---|---|---|
| ZeRO-1 | Optimiser states | All-Gather after optimiser step | ✅ Significant |
| ZeRO-2 | Optimiser states + Gradients | Reduce-Scatter for gradients, All-Gather for weights | ✅✅ Large |
| ZeRO-3 | Everything (Params + Grads + Opt State) | On-demand All-Gather (params), Reduce-Scatter | ✅✅✅ Extreme (FSDP) |
4.2 ZeRO-1: Sharding the Optimiser States
In vanilla DP, each GPU stores the full optimiser state (e.g., momentum, variance in Adam), even though only one update is needed per parameter.
ZeRO-1 splits this across GPUs:
- With GPUs, each stores and updates of the optimiser states.
- After updates, an All-Gather step synchronises the full parameter set.
Memory equation:
Where:
- = size of model params
- = optimiser state overhead (often 2× in Adam)
- = number of GPUs
4.3 ZeRO-2: Shard Gradients
ZeRO-1 still requires storing all gradients on each GPU. ZeRO-2 goes further:
- Gradients are also sharded across GPUs.
- Use Reduce-Scatter to share gradient computation results directly to the right GPU.
New memory equation:
Communication-wise:
- Gradients: Reduce-Scatter
- Updated weights: All-Gather
With ZeRO-2, we get up to 8x reduction in memory use compared to standard DP.
4.4 ZeRO-3: Shard Everything (FSDP in PyTorch)
ZeRO-3 (aka Fully Sharded Data Parallelism, or FSDP) takes things to the limit:
- Parameters, gradients, and optimiser states are all sharded across devices.
- During training, parameters are gathered on-demand, used, and then discarded.
This means:
- You only load what you need, when you need it.
- The model itself never fully exists on any single GPU.
Final memory equation:
Perfect for ultra-large models, but requires:
- Careful scheduling (e.g., prefetching)
- Higher communication bandwidth (frequent All-Gather ops)
4.5 Communication Shift: All-Reduce → Reduce-Scatter + All-Gather
Each ZeRO stage shifts the communication strategy:
- ZeRO-1: All-Gather full weights after update
- ZeRO-2: Reduce-Scatter gradients, All-Gather weights
- ZeRO-3: On-demand All-Gather during fwd/bwd, Reduce-Scatter gradients
This communication overhead can be overlapped with compute to minimise the cost (e.g., using hooks, async ops).
4.6 ZeRO vs DP Memory Use
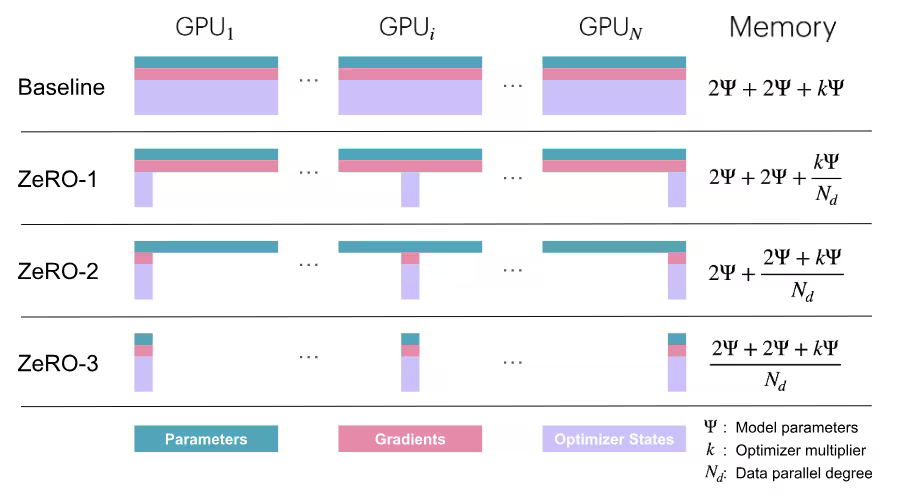
As seen above, memory usage drops dramatically with each ZeRO stage. ZeRO-3 opens the door to trillion-parameter models.
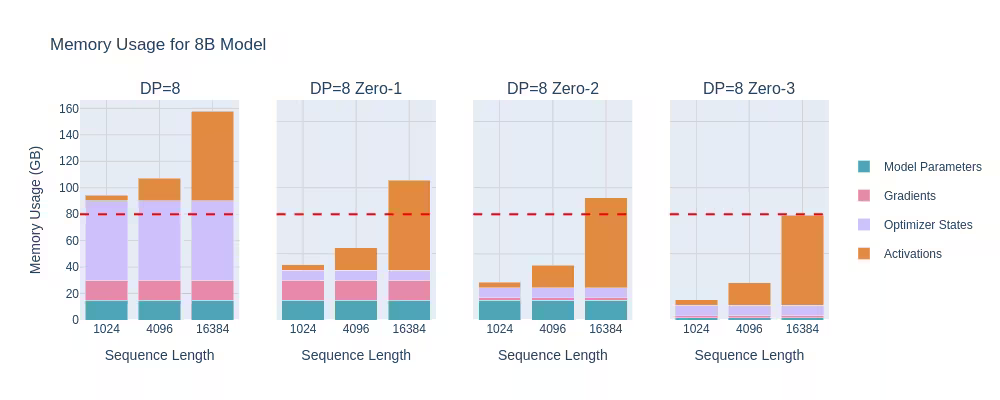
The above diagram shows how memory usage changes with ZeRO stages for an 8B parameter model. As we move from ZeRO-1 to ZeRO-3, the memory usage drops significantly, allowing for larger models to be trained on the same hardware.
But here’s the catch: even with ZeRO-3, we don’t reduce activation memory, which still grows with sequence length and batch size.
To scale further, we need a new axis of parallelism: splitting the model itself across GPUs.
5. Tensor Parallelism
As we saw with Data Parallelism and ZeRO, we can eliminate memory redundancy by sharding optimiser states, gradients, and even parameters across GPUs. But there’s one final bottleneck they can’t address: activation memory.
When working with long sequences or large hidden dimensions, activation memory (which scales with batch size and sequence length) becomes the dominant memory consumer.
To solve this, we introduce Tensor Parallelism (TP), a technique that
shards within a layer, not just across model components. It splits
matrix multiplications (like the ones in Linear or Attention layers)
across GPUs, allowing us to distribute activations, weights, and
gradients without requiring full parameter replication or communication.
5.1 Understanding Tensor Parallelism
In a feedforward layer, we typically compute:
Where:
- is the input activation tensor
- is the weight matrix
- is the output
Instead of computing this entire operation on one device, TP splits the matrix and distributes the computation.
There are two main ways to shard:
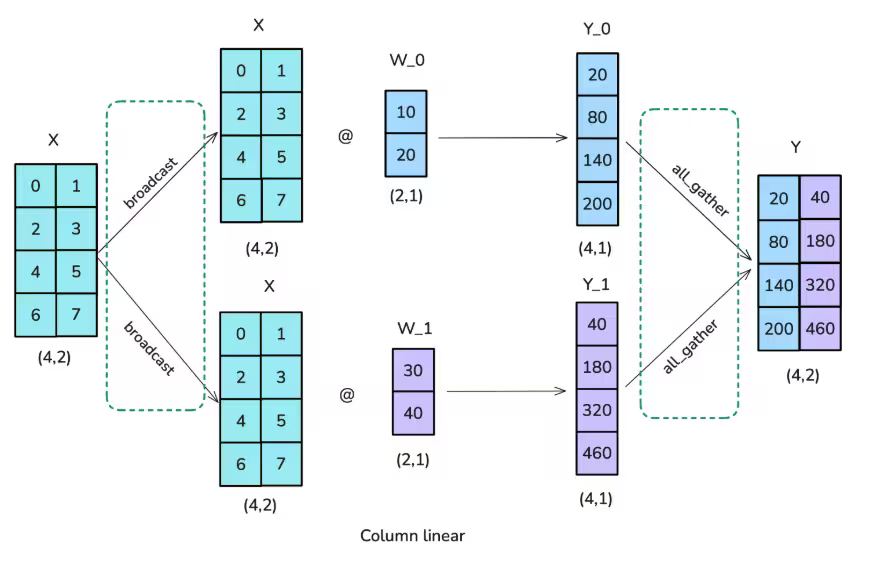
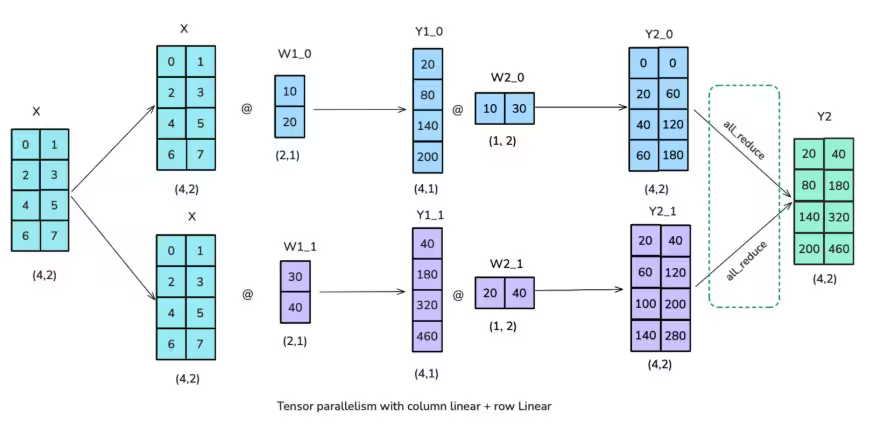
Column-wise Parallelism (a.k.a. Column Linear)
- The weight matrix is split along its columns across GPUs.
- Each GPU receives the full input (broadcast operation).
- Each GPU computes partial results.
- Partial results are then All-Gathered to reconstruct .
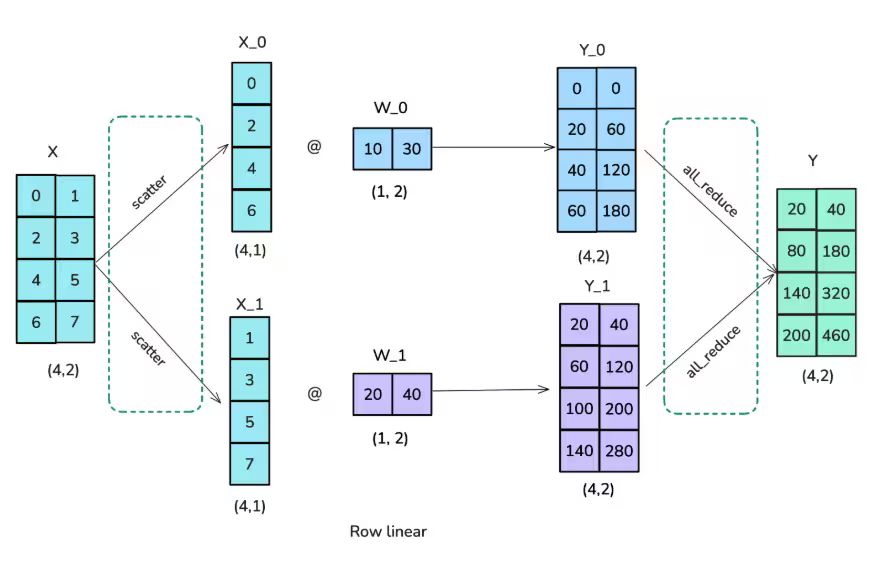
Row-wise Parallelism (a.k.a. Row Linear)
- The weight matrix is split along its rows across GPUs.
- The input is scattered across GPUs.
- Each GPU performs its local computation.
- Final results are All-Reduced to aggregate contributions.
5.2 Applying TP in Transformers
Transformer blocks consist of:
- Feedforward layers (MLPs)
- Multi-Head Attention (MHA)
Each can benefit from Tensor Parallelism.
TP in MLP Layers
- Step 1: Use Column-Parallel Linear for the first layer.
- Inputs are broadcasted.
- Weight matrix is column-sharded.
- Partial results are All-Gathered.
- Step 2: Use Row-Parallel Linear for the second layer.
- Inputs are row-sharded.
- Partial results are All-Reduced.
TP in Attention Layers
- The , , projections are column-sharded - each GPU processes a subset of attention heads
- The final projection is row-sharded - followed by an All-Reduce
This design plays well with Multi-Query and Grouped-Query Attention too.
Heads-per-GPU constraint: TP degree should be ≤ number of // heads, otherwise attention can’t be computed independently per rank.
5.3 Trade-Offs of Tensor Parallelism
| ✅ Pros | ❌ Cons |
|---|---|
| Reduces memory for weights, activations, grads | Requires All-Gather and All-Reduce |
| No full parameter sync needed | Poor scaling across nodes |
| Works well with MHA-heavy models | TP degree limited by # attention heads |
5.4 When to Use Tensor Parallelism
✅ You’re hitting activation memory bottlenecks
✅ You want to reduce per-GPU model size without parameter replication
✅ You’re working within a single node (best with ≤ 8 GPUs)
❌ You want to scale across multiple nodes - communication overhead from All-Gather/Reduce makes TP inefficient across nodes.
Up next: What if the model still doesn’t fit, or you want to spread it across dozens or hundreds of GPUs? Enter: Pipeline Parallelism.
6. Pipeline Parallelism
As we saw in Tensor Parallelism (TP), splitting individual operations across GPUs helps reduce memory usage, but it hits a wall when scaling beyond a single node due to interconnect bottlenecks. What if the model itself is just too big to fit on a single node?
Pipeline Parallelism (PP) solves this by slicing the model across its depth: different GPUs hold different layers of the model. This reduces the memory footprint per GPU and unlocks the ability to scale to massive models, even across nodes.
How It Works
Instead of replicating the full model on every GPU (like Data Parallelism), we partition the model into sequential stages, assigning groups of layers to different GPUs.
- With 8 GPUs, we could place:
- Layers 1-4 on GPU 0
- Layers 5-8 on GPU 1
- … and so on
Each input (or microbatch) is passed from one stage to the next, progressing through the model like on an assembly line.
✅ Pro: Each GPU only stores and processes a subset of the model
❌ Con: Each GPU must wait its turn, leading to idle time (the pipeline bubble)
The Pipeline Bubble
Because computation is sequential, early GPUs go idle during backward passes, and later GPUs go idle during forward passes. This idle time is known as the pipeline bubble.
To illustrate, consider 4 GPUs with 16 layers. The first GPU is done early in the forward pass and sits idle for the rest of training. Likewise, the last GPU waits through all the forwards before it can backpropagate.
To fix this, we use scheduling strategies that overlap computation and minimise bubbles.
Pipeline Scheduling Strategies
6.1 All-Forward-All-Backward (AFAB)
- Run all forward passes first, then all backward passes.
- Easy to implement, but:
- High memory usage (must store activations for all microbatches)
- Large bubble (GPUs wait around)
Simple, but inefficient.
6.2 One-Forward-One-Backward (1F1B)
- Alternate between one forward and one backward step per microbatch
- Reduces memory footprint (only need to store a few activations)
- Better GPU utilisation
Balanced, but more complex to schedule.
6.3 Interleaved Pipeline Parallelism
- Instead of assigning contiguous layers to GPUs, interleave layers
across devices, e.g.:
- GPU 0: layers 1, 3, 5
- GPU 1: layers 2, 4, 6
- Allows finer-grained overlap between microbatches
Smaller bubbles, but higher communication overhead.
6.4 ZeroBubble & DualPipe
- The most advanced: split backward pass into two parts:
- B: backward for input gradients (needed for chain rule)
- W: backward for weight gradients (needed only before optimiser step)
This lets us flexibly schedule these steps to perfectly fill idle time.
Near-perfect GPU utilisation, but requires custom schedulers and fine-tuned microbatching. This is very complex to implement, but offers the best performance.
6.5 Comparing Pipeline Strategies
| Schedule | Bubble Efficiency | Memory Usage | Complexity |
|---|---|---|---|
| AFAB | ❌ Low | ❌ High | ✅ Simple |
| 1F1B | ✅ Better | ✅ Moderate | ❌ Moderate |
| Interleaved | ✅✅ Great | ✅ Better | ❌❌ Harder |
| ZeroBubble / DualPipe | ✅✅✅ Optimal | ✅✅✅ Best | ❌❌❌ Advanced |
6.6 Trade-offs of Pipeline Parallelism
| ✅ Pros | ❌ Cons |
|---|---|
| Enables training models that span across multiple nodes | Idle time unless scheduled well (pipeline bubbles) |
| Significantly reduces memory usage per GPU | Harder to implement and debug |
| Pairs well with ZeRO and large batch sizes | Doesn’t reduce activation memory unless combined with 1F1B or interleaving |
Up next, we’ll address another bottleneck: long sequences. For that, we introduce two techniques - Sequence Parallelism and Context Parallelism, which focus on splitting activations rather than parameters.
7. Sequence & Context Parallelism
While Tensor Parallelism shards computations across GPUs along the hidden dimension, it leaves certain operations, like LayerNorm and Dropout, untouched. These still require the full activation, limiting memory savings.
7.1 Sequence Parallelism (SP)
Sequence Parallelism (SP) complements TP by sharding computations along the sequence dimension instead.
This is especially useful for:
- LayerNorm, which computes stats across hidden dimensions
- Dropout, which applies randomness per-token
How It Works
- The activations (hidden states) are split across the sequence axis, i.e., each GPU handles a different range of tokens.
- Each GPU computes LayerNorm or Dropout independently.
- For operations that follow (like a column-linear layer), an All-Gather is performed to restore the full sequence.
Communication Pattern
- In forward pass:
- SP regions do local computation.
- An All-Gather is needed before TP operations.
- In backward pass:
- A Reduce-Scatter is used to shard gradients again across the sequence dimension.
| ✅ Pros | ❌ Cons |
|---|---|
| Reduces activation memory during LayerNorm and Dropout | Requires coordination of communication between TP and SP transitions |
| Keeps GPUs focused only on their assigned sequence range | Dropout must sync random seeds across GPUs |
| Can be combined with TP for full-shard efficiency |
7.2 Context Parallelism (CP)
When sequences grow extremely long (e.g. 128k tokens), even TP + SP combined can fall short, especially because TP regions still need to process the full sequence per GPU.
Context Parallelism (CP) addresses this by sharding the entire sequence, including attention blocks, across GPUs.
That’s right: instead of having all tokens on each GPU, each GPU gets only a chunk of the sequence, and attention is computed across them.
The Challenge: Attention Needs Context
In attention layers, each token needs to attend to all previous tokens (causal attention) or the full context.
So what happens when different GPUs hold different parts of the sequence?
We need a way to share the missing key/value (KV) pairs efficiently.
7.2.1 Ring Attention
To avoid a heavy All-Gather of KV pairs, Ring Attention was introduced.
Here’s how it works:
- Each GPU computes attention for its local tokens using local KV pairs.
- KV pairs are passed to the next GPU in a ring topology.
- While waiting for new KV pairs to arrive, each GPU keeps computing with what it has.
- This overlap of communication and computation minimises idle time.
7.2.2 Fixing Load Imbalance: Zig-Zag Ring Attention
In standard Ring Attention, early GPUs finish faster, creating a workload imbalance.
Zig-Zag sharding distributes both early and late tokens to each GPU, evening out the work.
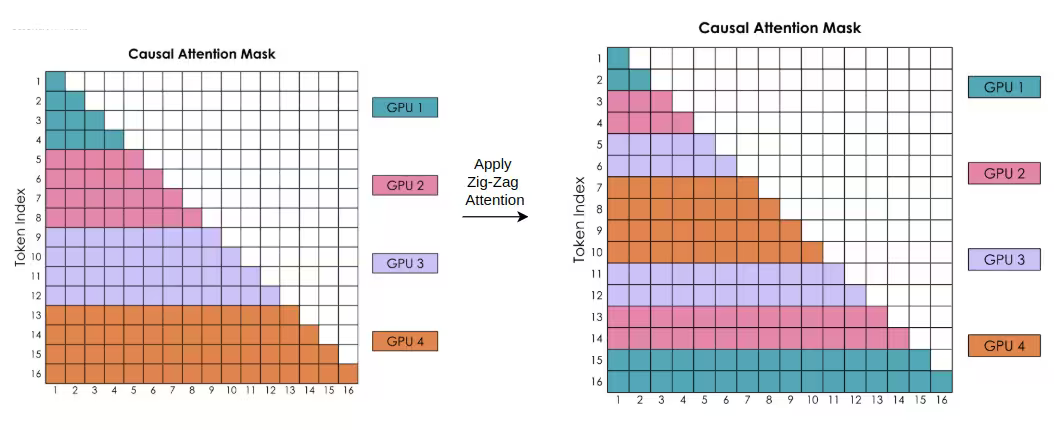
In the above figure, we see how Zig-Zag Ring Attention distributes tokens across GPUs in a more balanced way, reducing idle time and improving efficiency. If you count the number of coloured squares, you’ll see that the computation is now balanced across all GPUs.
7.2.3 Communication Strategies in CP
| Strategy | Description | Pros | Cons |
|---|---|---|---|
| All-Gather | Collect all KV pairs from all GPUs before computing attention | Simple | High memory usage |
| All-to-All (Ring) | Stream KV pairs between GPUs step-by-step | Memory efficient | More complex to implement |
7.2.4 SP vs CP: What’s the Difference?
| Feature | Sequence Parallelism (SP) | Context Parallelism (CP) |
|---|---|---|
| Shards | Dropout / LayerNorm activations | Full attention activations |
| Axis | Sequence dimension (local ops) | Sequence dimension (global attention) |
| Comm | All-Gather / Reduce-Scatter | Ring All-to-All (KV pairs) |
| Use Case | Medium-long sequences (17k) | Ultra-long sequences (128k+) |
7.2.5 Trade-offs of Sequence and Context Parallelism
| Technique | ✅ Pros | ❌ Cons |
|---|---|---|
| Sequence Parallelism | Reduces LayerNorm/Dropout memory, works with TP | Limited to non-attention ops |
| Context Parallelism | Enables 128k+ tokens, uses Ring Attention | Complex attention comms |
To tie this all together: Sequence Parallelism (SP) happens before the TP block and handles operations like LayerNorm and Dropout by sharding activations along the sequence dimension. Tensor Parallelism (TP) then takes over to perform matrix multiplications, operating across the hidden dimension by splitting weights and activations across GPUs. Finally, Context Parallelism (CP) comes into play during attention, distributing tokens across GPUs and using Ring Attention to efficiently exchange key/value pairs, enabling training with ultra-long sequences (e.g. 128k tokens) without exhausting memory.
8. Expert Parallelism
We’ve now covered Data, Tensor, Sequence, Context, and Pipeline Parallelism, but there’s one last powerful strategy: Expert Parallelism (EP).
This method is tailored for Mixture of Experts (MoE) models, a family of architectures used in models like GPT-4, Mixtral, and DeepSeek-V3.
What is Expert Parallelism?
Instead of using a single feedforward layer per transformer block, MoE models introduce multiple parallel feedforward “experts”, but only a subset of them is activated per token:
- Each expert is an independent feedforward module.
- A router dynamically assigns tokens to specific experts.
- Experts operate independently and can be distributed across GPUs.
Unlike Tensor Parallelism, which shards matrix multiplications, EP assigns full experts to GPUs, making it more communication-efficient.
How Expert Parallelism Works
To visualise how Expert Parallelism fits into the training process, consider the following:
- Routing: The Router directs tokens to a subset of experts (usually top-1 or top-2).
- Parallel Execution: Each expert processes tokens independently on different GPUs.
- Aggregation: Outputs are gathered and passed along to the next layer.
Combining Expert Parallelism with Other Techniques
Expert Parallelism doesn’t act alone, it’s usually combined with:
- EP and Data Parallelism: DP handles token batches, EP handles expert distribution.
- EP and Tensor Parallelism: TP for dense layers, EP for sparse MoE layers.
- EP and Pipeline Parallelism: PP splits layers across devices; EP splits experts within MoE layers.
This layered approach enables training of massive models with optimal memory and compute.
Real-World Example: DeepSeek-V3
DeepSeek-V3 uses token-to-4 expert routing, ensuring:
- Efficient GPU usage
- Tokens remain within a single node
- Reduced communication across nodes
Trade-offs of Expert Parallelism
| Pros | Cons |
|---|---|
| ✅ Scales MoE models efficiently | ❌ Requires router design and tuning |
| ✅ Avoids redundant compute | ❌ Load imbalance can degrade throughput |
| ✅ Integrates with other parallelism forms | ❌ Slightly more complex to implement |
9. Putting It All Together: A Real-World Training Architecture
Throughout this blog, we’ve explored six powerful strategies for distributing training:
- Gradient Accumulation - Helps simulate large batches without added memory cost
- Data Parallelism (DP) - Replicates models and splits data
- Tensor Parallelism (TP) - Shards matrix multiplications within layers
- Pipeline Parallelism (PP) - Splits layers across devices
- Sequence & Context Parallelism (SP & CP) - Shards activations along sequence length
- Expert Parallelism (EP) - Routes tokens to sparse subnetworks in MoE models
Individually, each of these techniques unlocks new memory or compute efficiencies. But real-world models combine them into complex distributed systems.
Let’s visualise how these layers of parallelism can interact in a single training run:
9.1 Distributed Training Topology
This diagram brings together all the levels of parallelism we’ve discussed:
Data Parallelism (DP):
There are two full model replicas (Replica 1 and 2), each trained on different data shards across different nodes. Gradients are synchronised between them using All-Reduce.Pipeline Parallelism (PP):
Within each node group, the model is sharded by layers across multiple GPUs. For example:- GPU 0 handles layers 1-2
- GPU 2 handles layers 3-4, etc.
Intra-Layer Parallelism (inside Layer 3):
Transformer layers consist of many subcomponents (LayerNorm, MLPs, Attention). These are further parallelised using:- Sequence Parallelism (SP): Splits operations like LayerNorm/Dropout across tokens in the sequence.
- Tensor Parallelism (TP): Splits matrix multiplications (e.g. MLPs, QKV) across GPUs.
- Context Parallelism (CP): Splits the sequence across GPUs to scale attention to long contexts using Ring Attention.
- Expert Parallelism (EP): Used in MoE layers to route tokens to different feedforward networks (experts) hosted on different GPUs.
9.2 When to Use What: A Strategy Guide
| Parallelism Type | Use When | Main Benefit |
|---|---|---|
| Gradient Accumulation | Memory too tight for desired batch size | Simulates large batches |
| Data Parallelism | Model fits on one GPU, want to scale across data | Simplest way to scale |
| ZeRO / FSDP | Model barely fits on GPU | Shard optimiser states and parameters |
| Tensor Parallelism | Layers are large (e.g. MLPs, Attention) | Shard matrix ops to save memory |
| Sequence Parallelism | Dropout or LayerNorm uses too much memory | Shard sequence activations |
| Context Parallelism | Sequence length exceeds GPU memory | Enables 128k+ tokens |
| Pipeline Parallelism | Model is too large for one GPU | Shard layers across devices |
| Expert Parallelism | Using MoE models | Shard sparse subnetworks efficiently |
Conclusion
We’ve come a long way from squeezing more memory out of a single GPU with gradient accumulation, to designing multi-GPU, multi-node systems capable of training trillion-parameter models.
Each technique in 5D Parallelism tackles a different bottleneck, and here’s what we’ve learnt:
- Data Parallelism scales training samples across devices.
- Tensor and Sequence Parallelism reduce memory pressure within layers.
- Context Parallelism enables ultra-long sequence training.
- Pipeline Parallelism distributes model depth across GPUs.
- Expert Parallelism adds sparsity and specialisation using dynamic routing.
By understanding how and when to combine these strategies, you can scale smarter, whether you’re training a GPT-7 in a datacenter or fitting a model on a constrained setup.
The key isn’t just more GPUs, it’s the right kind of parallelism at the right level.
What Next?
- Revisit the previous blog to refresh memory-saving techniques like gradient checkpointing.
- Explore open-source tools like DeepSpeed, FSDP, and Megatron-LM that bring these ideas to life.
- Experiment in your own setup, test parallelism strategies, tune microbatch sizes, and track memory/throughput trade-offs.
Whether you’re building research prototypes or production-grade models, parallelism is your toolkit for scaling beyond limits.
